
Accounts and authentication
Configure accounts and set up authentication for Patronus AI self-hosted deployment
After successfully deploying Patronus AI, configure accounts and authentication to enable user access.
Prerequisites
Before proceeding, ensure:
- Patronus AI deployment is complete and all pods are running
- You have access to the Admin Portal URL (configured in
values.yamlas<PATRONUS_ADMIN_PORTAL_HOST>) - If using an Identity Provider (IdP), ensure it's properly configured with Vouch Proxy
Access the Admin Portal
The Admin Portal is the administrative interface for managing accounts, users, and authentication mappings.
Find your Admin Portal URL:
Check your values.yaml configuration or ingress settings:
Navigate to your Admin Portal URL in a web browser (e.g., https://admin.example.com).
Authentication strategies
Patronus AI supports two authentication strategies:
Identity Provider (IdP) authentication
Recommended for production environments
Uses your organization's existing identity provider (Microsoft Entra ID, Google Workspace, Amazon Cognito, Auth0, etc.) through Vouch Proxy integration.
Benefits:
- Centralized user management
- Single Sign-On (SSO) experience
- Advanced security features (MFA, conditional access)
- Automatic user provisioning/deprovisioning
Simple authentication
Recommended for POC/UAT/development environments
Uses username and password authentication managed directly within Patronus AI.
Benefits:
- Quick setup without external dependencies
- Simple for testing and development
- No external IdP configuration required
Create an account
Step 1: Navigate to Accounts
In the Admin Portal, go to the Accounts section and click Add Account.
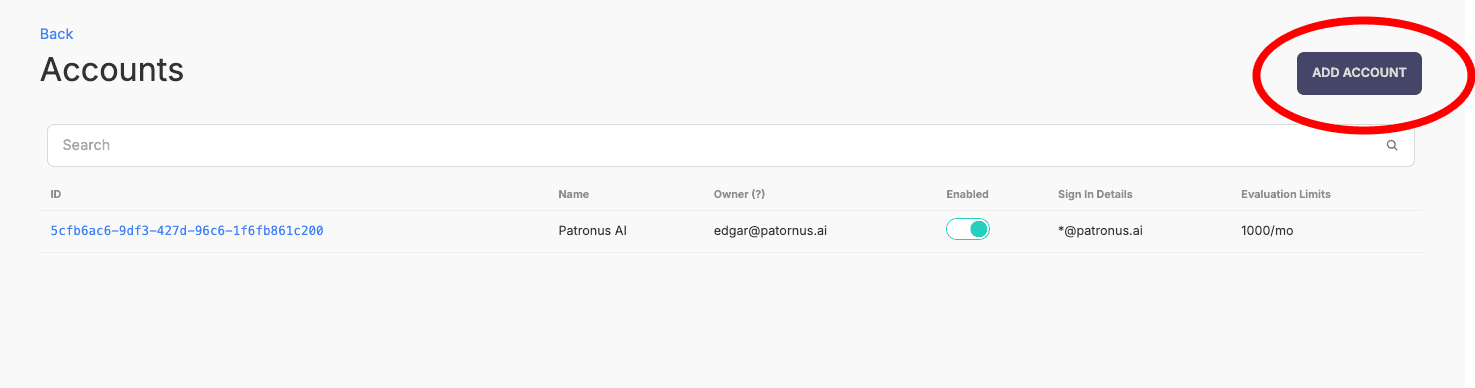
Step 2: Configure account settings
Fill in the following fields:
- Account Name: Your organization or team name (e.g.,
acme-engineering) - Owner Email: Email address of the account owner (for reference purposes)
- Sign In Strategy:
- Select Domain if using IdP authentication
- Select Users if using simple authentication
- Sign In Domain: (Only if using Domain strategy) Your organization's domain (e.g.,
example.com) - Limits Enabled: Set to False (can be enabled later if needed)
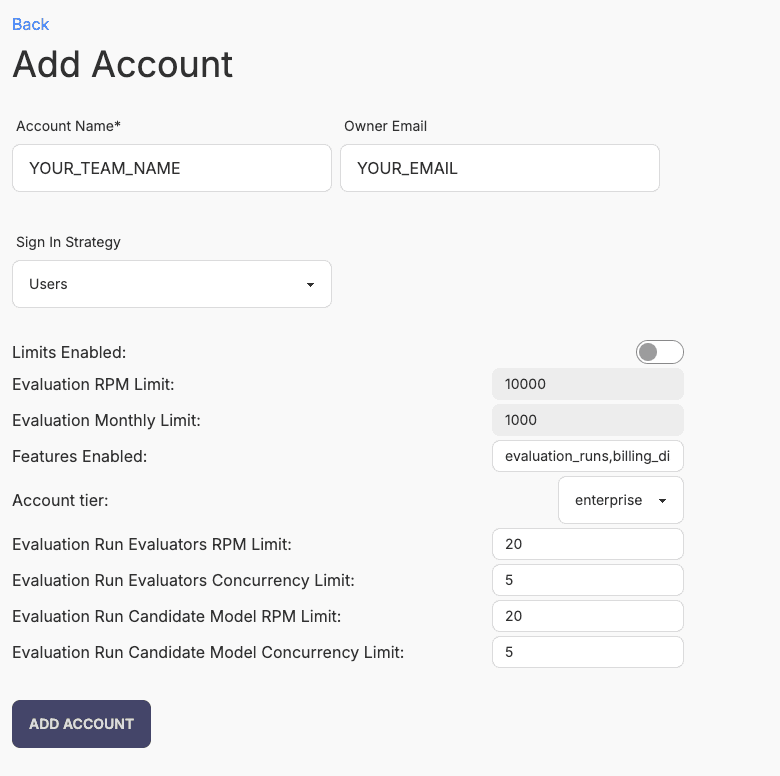
The owner email is for reference only and does not restrict account access. Access control is managed through role mappings (IdP) or user keys (simple auth).
Step 3: Create the account
Click Add Account to create your team account.
Configure authentication
Choose the appropriate configuration based on your authentication strategy:
IdP authentication setup
Step 1: Navigate to System Authentication
In the Admin Portal, go to System Authentication and click Add Mapping.
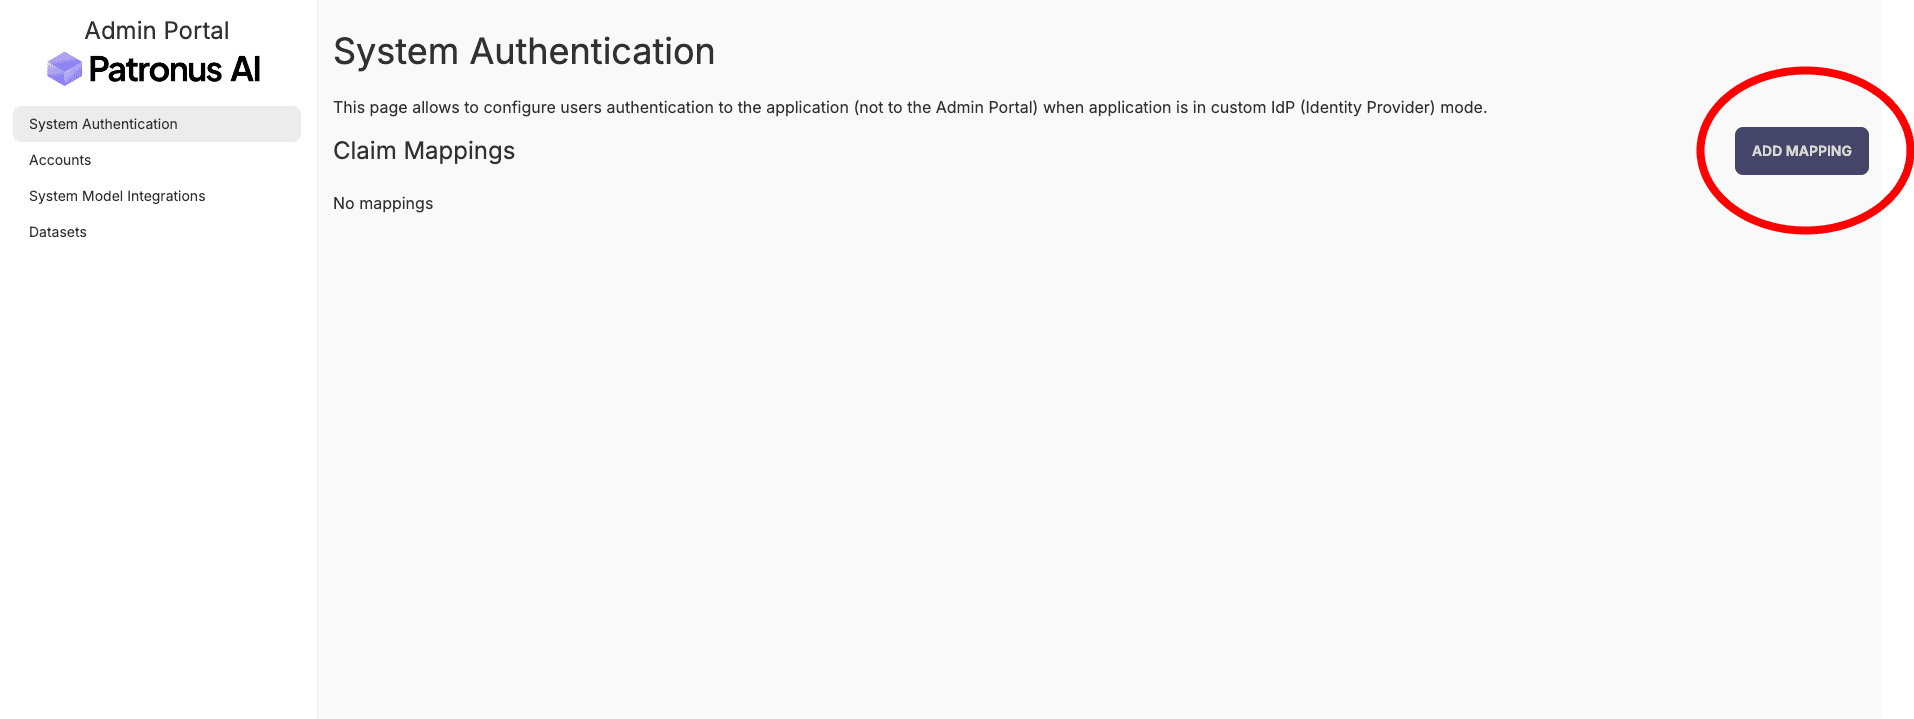
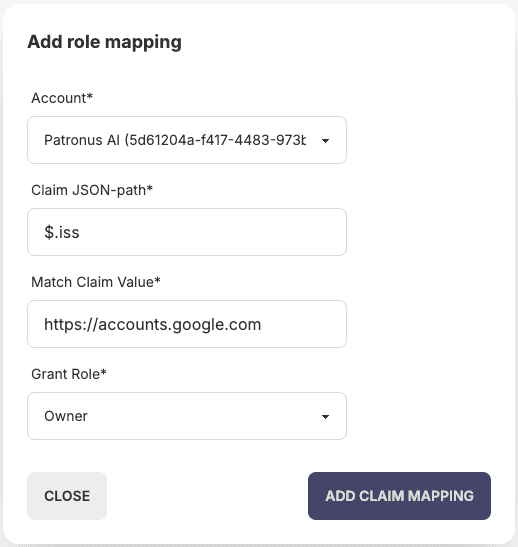
Step 2: Configure role mapping
Role mappings control which users can access Patronus AI and what permissions they have based on JWT token claims.
Configure the mapping:
- Account: Select the account you just created
- Claim JSON-path: JSONPath expression to extract the claim from the JWT token
- Match Claim Value: The value that must match to grant access
- Grant Role: Role to assign (Owner or Member)
Common claim mapping examples
Grant access to all users from your IdP
This grants access to all users authenticated by Google.
Grant access based on email domain
This grants access to users with email addresses ending in @example.com.
Grant access based on groups
This grants access to users who have "engineering" in their groups claim.
Grant owner access to specific user
This grants Owner role to a specific user.
Step 3: Understand JWT token structure
Role mappings work by examining claims in the JWT token issued by your IdP. Here's an example token payload:
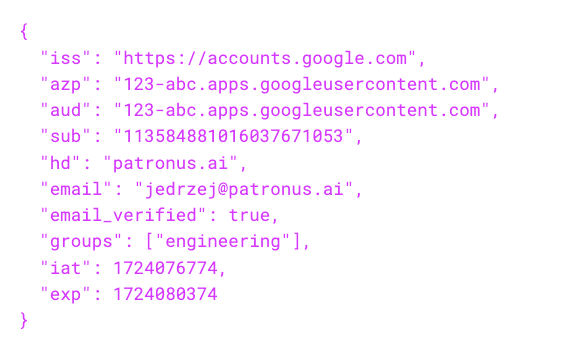
Common JWT claims:
iss- Token issuer (e.g.,https://accounts.google.com)sub- Subject (user identifier)email- User's email addressaud- Audience (client ID)groups- User's group memberships- Custom claims - Provider-specific fields
Viewing your JWT token:
You can inspect your JWT token by navigating to:
This endpoint returns your current token information, which helps you understand the exact claim structure and values available for role mapping configuration.
You can also use your IdP's token inspection tools or JWT.io to decode and view the token structure.
Step 4: Test authentication
- Navigate to your Patronus App URL (e.g.,
https://app.example.com) - You should be redirected to your IdP's login page
- Sign in with your IdP credentials
- After successful authentication, you should be redirected back to the Patronus App
If authentication fails, check:
- Vouch Proxy configuration in
values.yaml - IdP OAuth client configuration (redirect URIs, client ID/secret)
- Role mapping configuration (ensure claims match your token)
- Vouch Proxy logs:
kubectl logs -n patronus deployment/vouch
Role types
Patronus AI has two role types:
Owner
- Full administrative access
- Can manage account settings
- Can add/remove users
- Can configure integrations
- Can view and modify all projects and evaluations
Member
- Standard user access
- Can create and manage their own projects
- Can run evaluations
- Can view shared projects
- Cannot modify account settings
Choose role assignments based on your organization's access control requirements. Start with Member access and grant Owner access only to administrators.
Multi-account setup
You can create multiple accounts for different teams or environments:
- Create separate accounts for each team (e.g.,
engineering,qa,data-science) - Configure appropriate role mappings for each account
- Users can be granted access to multiple accounts
This allows for:
- Team isolation
- Separate billing/usage tracking
- Different access control policies per team
Troubleshooting
Cannot access Admin Portal
Issue: Unable to reach the Admin Portal URL
Solutions:
- Verify ingress configuration:
kubectl get ingress -n patronus - Check DNS resolution for your admin portal domain
- Verify TLS certificates are properly configured
- Check nginx/ingress controller logs for errors
IdP authentication fails
Issue: Users redirected to IdP but cannot authenticate
Solutions:
- Test Vouch Proxy authentication by accessing:
200 OK. If not, check Vouch Proxy configuration. - Verify OAuth client configuration in your IdP
- Check redirect URIs match your application URLs
- Verify Vouch Proxy configuration in
values.yaml - Check Vouch Proxy logs:
kubectl logs -n patronus deployment/vouch - Ensure role mappings are correctly configured
Role mapping not working
Issue: Users can authenticate but cannot access the application
Solutions:
- Inspect the JWT token to verify claim structure by visiting:
- Update the Claim JSON-path to match your token structure
- Verify the Match Claim Value matches the actual claim value
- Check for typos in email addresses or group names
- Ensure at least one role mapping exists for the user
Next steps
After configuring accounts and authentication:
- Model Installation - Deploy containerized models (optional)
- Access the Patronus App and start creating projects
- Configure integrations (OpenAI, Anthropic, etc.)
- Enable/Upload datasets
- Run your first evaluations
Additional resources
- Vouch Proxy Documentation
- JWT.io Token Inspector - Decode and inspect JWT tokens
- JSONPath Online Evaluator - Test JSONPath expressions
- Architecture Overview - Understand authentication flow